Quick Navigation
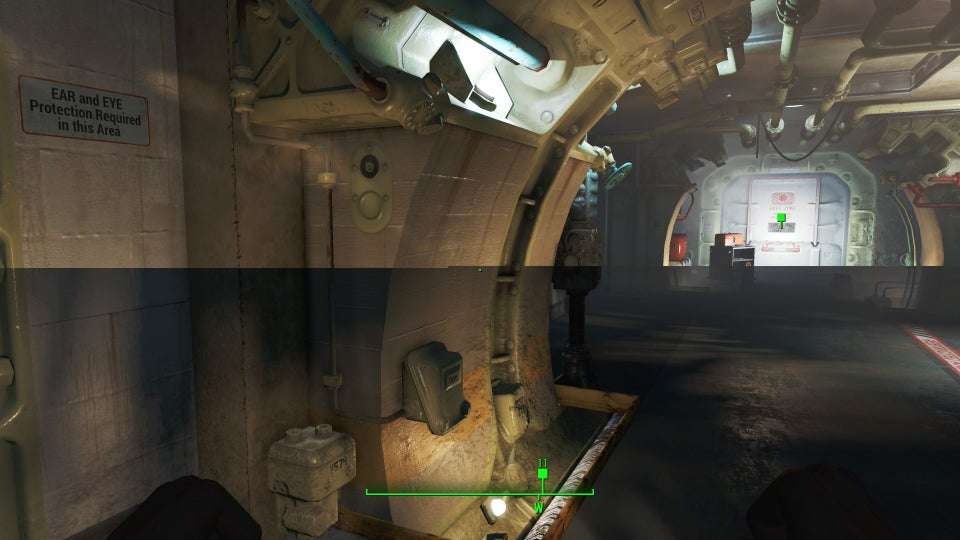
The screen tearing occurs mostly when you are playing games on your PC. It happens when the graphics card (GPU) and the monitor connected to it fall out of sync with each other. When the screen tearing occurs, the top portion of the display shows a different frame than the bottom.
Initially, Vsync was made to eliminate screen tearing. It limits the maximum of the game FPS to measure your monitor’s refresh rate, but VSync can also harm your FPS. It can reduce your fps as low as 30fps. However, Triple buffering can solve this problem but it can also cause other issues.
Fixing Screen Tearing Without Vsync
Currently, there are only two solutions available to stop the screen tearing without Vsync. Nvidia G Sync or AMD Free Sync but for both, you require a specific type of monitor which supports this technology. There’s a 3rd party tool called Nvidia Inspector for Nvidia GPUs only but that does not guarantees a permanent solution and will not work for all.
This means if you buy a new monitor compatible with Nvidia’s or AMD’s Sync technology, then you really don’t need to depend on the Vsync of a graphics card to eliminate the screen tearing.
You will still face problems of tearing, input lags, fps drops, bad performance, and stuttering.

Step by Step Tutorial for Fixing Screen Tearing in both Nvidia and AMD GPU
Solution for Nvidia
Step 1
Open the Nvidia Control Panel by right-clicking on your desktop, a menu pops up in which you will find the NVIDIA Control Panel option. Click to Open it up.
Step 2
Go to 3D Settings → Manage 3D Settings. In the Settings menu, scroll down to the following options and make these changes respectively.
- Max Frame Rate set it to 60fps or if you have a higher 75Hz monitor then set it to 75fps. This will make the game run smooth and eliminate bottlenecking as well which will also boost the performance
- Vertical sync (VSync) make sure you set Vsync to OFF.
- Low Latency Mode set it to Ultra which will make the input delay low.
- Ambient Occlusion set it to Performance if you have a midrange GPU. It will not give too much quality but it focuses more on the performance and smoothness. Or if you have a really good GPU like RTX 2080 or higher, then set it to Quality because you already have a good graphics card to keep up with the pace.
- Power management mode set it to Prefer maximum performance as well.
- Texture filtering – Quality set it to High performance
- Triple buffering set it to ON. This will also make the VSync smooth.
- Texture filtering – Trilinear optimisation set it to ON if you have selected High performance.
- Texture filtering – Negative LOD bias set it to Allow if you have selected High performance.
Basically, after putting everything on High performance rather than Quality because Quality focuses more on the Texture quality. But if you only want the best performance, higher FPS, and smooth experience, then you should go with the High-performance configuration.
- Optimise for Compute Performance set it to OFF because we are only running games and not other programs.
- OpenGL rendering GPU select your graphics card.
- Multi-Frame Sampled AA (MFAA) set it to ON. This will hold the Anti-Aliasing and make it smoother.
- DSR – Factors set it to OFF because it will only lower your performance.
- CUDA – GPUs make sure you select your graphics card.
- Antialiasing – Transparency set it to Multisample because it willgive you the best performance.
- Also, Antialiasing – Mode set it to Application-controlled.
- Antialiasing – Gama correction set it to ON.
- Anisotropic filtering set it to Application-controlled.
- Image Sharpening set it to OFF but enable the GPU Scaling.
After that, once you have done all of these Settings. Go to the right corner of the window and click on Apply for all the changes to take effect.
- Configure Surround, PhysX
Now, go down to the Configure Surround, PhysX option under the same 3D Settings tab. In the PhysX, choose your graphics card.
Step 3
Go to the second tab Display and make the following changes.
- Change resolution
Choose the resolution according to your monitor and also select the maximum refresh rate supported.
- Apply the following settings
Select Use NVIDIA color settings and make sure you select the Highest Desktop color depth and the Full Output dynamic range.
Under the same tab go to Adjust desktop color settings and make the following changes.
- Choose how colour is set
Select Use NVIDIA settings and leave the rest configuration the same as it is.
- Apply the following enhancements
You can set the Digital Vibrance according to your liking. Usually, the default 50% is fine.
Step 4
Now, go to the third and last tab Video and make the following changes.
- Adjust video colour settings
Choose to Use the NVIDIA settings and select the Advanced tab. Set the Dynamic range and make sure you put that to Full.
- Adjust video image settings
Select the same Use the NVIDIA settings for both Edge Enhancement and noise reduction as well. At the end make sure you press Apply.
Step 5
Launch your game and go straight to the Graphics settings. Make sure you first Disable the V-Sync inside the game.
ALL DONE!
Go and enjoy playing your game with no screen tearing and Vsync off. Also, there will be no input lag or input delays.
Solution for AMD
Step 1
- Open AMD Radeon Software
You can open AMD Radeon Software by right-clicking on your desktop background where a menu pops up in which at the very top you will find the AMD Radeon Software option above the View option.
Step 2
Go to the Settings → Graphics section. In the Global Graphics, select your Graphics Profile to eSports so it will already enable Radeon Anti-Lag, and Radeon Image Sharpening by default.
- Disable Verticle Refresh (VSync)
Set the V-Sync to Always off so it always remains disabled.
Step 3
Scroll down further to the Advanced tab and make the following changes respectively.
- Anti-Aliasing set it to Use application settings.
- Anti-Aliasing Method set it to Multisampling.
- Morphological Anti-Aliasing leave it to Disabled.
- Anisotropic Filtering leaves it to Disabled as well.
- Texture Filtering Quality set it to Performance.
- Surface Format Optimization set it to Enabled.
- Tessellation Mode you need to set this to Override application settings.
- Maximum Tessellation Level set it to 8x. If you have selected the eSports preset then it will already do this by default.
Step 4
- Display
Next, go to the Display section. So, in the Display Options if you have an AMD FreeSync or NVIDIA G-Sync monitor then you need to set VRR (Variable-refresh-rate Technology) to Enabled. This is going to eliminate Screen Tearing and reduce Input Lag as well.
Or
If you don’t have free sync or a G-sync monitor then you will be unable to enable this VRR option. But don’t worry there is another advised way for you to go back to the Graphics section and set the Radeon Enhanced Sync to Enabled. So, this is going to be the alternative for FreeSync and will remove both visual tearing and input lag.
Step 5
Launch your game and go straight to the Graphics Settings and make sure you first Disable the V-Sync inside the game. Set most of the Details, Textures, and Effects settings to Ultra and High.
Conclusion
Hope you have learned how to stop screen tearing with v-sync disabled. Have fun playing your game Tear-Free and free from any kind of input lag or input delays.

Hi, I’m the author and founder of this blog. I have more than 10 years of experience in the industry. Throughout my journey I’ve tested and reviewed hundreds of graphics card for custom PC builds. I believe my knowledge and experience will help you choose the card that really falls to your needs and budget.


